Before you can undertake any image editing, you need to transfer the images to your PC. Depending on the source of the pictures, there are a variety of methods of doing this, but in nearly every case, the work of importing your photos can be handled by F-Spot. But before we cover F-Spot, let’s briefly recap the various methods of transferring images to your PC.
Connecting Your Camera
Most modern cameras use memory cards to store pictures. If you have such a model, when you plug the camera into your PC’s USB port, you should find that Ubuntu instantly recognizes it. An icon should appear on the Desktop, and double-clicking it should display the memory card’s contents in a Nautilus window. Along the top of the window, you’ll see an orange bar reading, “This media contains digital photos” alongside a button marked Open F-Spot Photo Manager. Clicking this button starts F-Spot, with which you can copy the images to your hard disk, as explained in the next section. Of course, you can also drag and drop pictures to your hard disk manually using Nautilus.
In the unlikely event that your camera doesn’t appear to be recognized by Ubuntu, you might have more luck with a generic USB memory card reader, which will make the card appear as a standard removable drive on the Desktop. These devices are relatively inexpensive and can usually read a wide variety of card types such as SD, XD, and CompactFlash (CF), making them a useful investment for the future. Some new PCs even come with card readers built in, but they often are hard to address in Linux environments. Most generic USB card readers should work fine under Linux, though, as will most new digital cameras.
Importing Photos Using F-Spot
F-Spot is designed to work in a similar way to applications you may have encountered under Windows or Mac OS X, such as iPhoto or Picasa. After you run F-Spot (from the Panel, select Applications and type F-Spot in the Search bar), or after you click the Open F-Spot Photo Manager button that appears along the top of a Nautilus file browser window when you insert a memory card or attach your digital camera, the F-Spot Import window will appear. (Depending on your configuration, the Import window may
appear within a file browser.) For some devices, though, this doesn’t happen automatically. If, for instance, you attach your mobile phone to your computer, you may have it attached as a disk device by default. To import photos in that case also, use the Import button in F-Spot to browse to the appropriate device and import your pictures from there.
The Import window contains a preview of the pictures stored in your camera, the option to tag the pictures, and the target directory where the photos will be copied. If you have no camera attached, you’ll see some default pictures that are available in the F-Spot program directory. While working on your camera, by default, all the pictures are selected. You can deselect and select photos by using the standard selection techniques (Ctrl-click or Shift-click). Embedded tags are very useful in filtering and searching for pictures. The default target directory where the photos will be copied is Photos in your /home directory, but you can change it to any directory you want.
To import the pictures from your camera to your hard disk, just click the Import button. F-Spot will import your photos in the target location, in directories named after the year, month, and day the photos were originally taken.
Importing pictures from a folder on your computer’s hard disk is easy. Click Photo > Import. In the Import window, click the Import Source drop-down list and then click Select Folder. Using the file browser, navigate to the folder containing your images and then click Open. (Don’t double-click the directory, because that causes F-Spot to open the directory in the file browser.) After you’ve selected the folder, F-Spot displays thumbnail previews of the images, and this might take some time. Keep your eye on the orange status bar. When this indicates “Done Loading,” you can click the Import button to import all the images in one go, or Ctrl-click to select photos in the left side of the window and then click the Import button.
If you’re importing the photos from a particular event, this is also a great time to define a set of tags for the whole set, which will save having to manually tag pictures later. Using tags makes it much easier to find back your photos later. Of course, a well-organized directory tree containing your photo albums might suit you as well. As with photos from a camera, by default, F-Spot copies the images into a directory it creates within your /home directory, called Photos. Therefore, after you’ve imported the photos, you can delete the originals if you want. You may also choose to keep them; at least that will give you the option to go back to the original picture and start all over if something goes wrong with your photo in F-Spot.
After the photos have been imported, the main F-Spot window will appear. On the left are the default tags and a list of any tags added to imported files. On the right is the picture preview window, which can be set to either Browse or Edit Photo mode. You can switch between these two modes by using the buttons on the toolbar. You can also view an image full screen or start a slide show that will cycle through the images in sequence.
Above the picture window is the timeline. By clicking and dragging the slider, you can move backward and forward in the photograph collection, depending on when the pictures were taken. Each notch on the timeline represents a month in the year marked beneath the timeline. The graphs on the timeline give a general idea of how many photographs were taken during that particular month (or, indeed, if any were taken during a particular month). The arrows to the left and right of the timeline can be used to expose a different set of months.
Tweaking Photos
F-Spot offers you all you need to do basic photo editing. By either double-clicking an image or selecting an image and clicking Edit Photo on the toolbar, you can tweak images by cropping them, adjusting brightness and contrast, or setting the color saturation/balance. The available tools appear in a docked toolbar, replacing the default tags pane, as shown in Figure 18-1. In addition, you can convert images to black-and-white or sepia tone, and you can remove red-eye caused by an indoor flash. All of this can be achieved by clicking the buttons at the left side of the image. (Hovering the mouse cursor over an icon will cause a tooltip to appear, explaining what the button does.) Simple rotations on single images or multiple selections can be performed by using the Rotate Left and Rotate Right buttons on the toolbar.
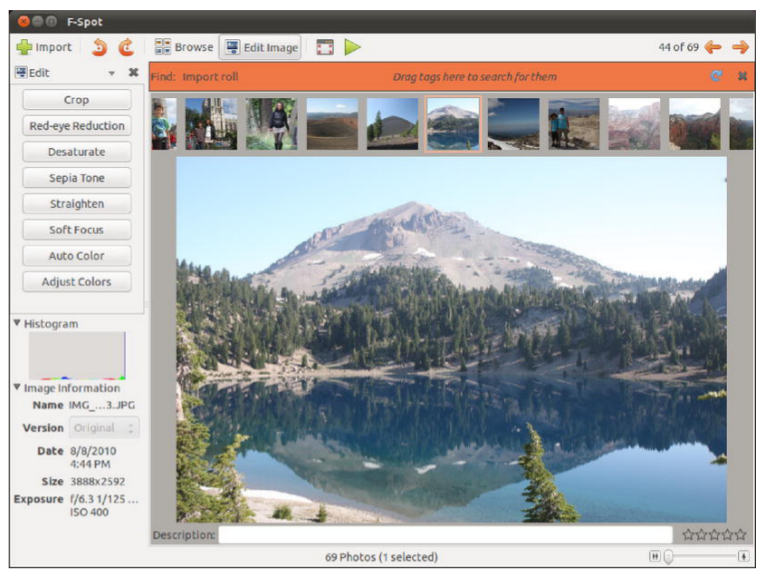
Figure . Any edits to the image are made live, so it’s a good idea to move the adjustment dialog box out
of the way.
Tagging Images
F-Spot’s cataloging power comes from its ability to tag each image. A tag is simply a word or short phrase that can be attached to any number of images, rather like a real-life tag that you might find attached to an item in a shop. After images have been tagged, you can then filter the images by using the tag word. For example, you could create a tag called German vacation, which you would attach to all images taken on a trip to Germany. Then, when you select the German vacation tag, only those images will be
displayed. Alternatively, you could be more precise with tags—you could create the tags Dusseldorf and Cologne to subdivide pictures taken on the vacation.
If your collection involves a lot of pictures taken of your children at various stages during their lives, you could create a tag for each of their names. By selecting to view only photos tagged with a particular child’s name, you could see all the pictures of that child, regardless of when or where they were taken. Images can have more than one tag. A family photo could be tagged with the words thanksgiving, grandma’s house, family meal, and the names of the individuals pictured. Then, if you searched using any of the tags, the picture would appear in the list.
A handful of tags are provided by default: Favorites, Hidden, People, Places, and Events. To create your own tags, right-click under the tag list on the left of the F-Spot program window and select Create New Tag. Simply type in the name of the new tag in the dialog box and click OK. If you tagged items on importing, these will appear under the Import Tags parent. Drag and drop these tags to the appropriate parent tag (Germany under Places, for example).
Tags can also have icons attached to them. An icon based on the first photo that is tagged will automatically be added to the tag name, but to manually assign one, right-click it in the list and select Edit. Next, in the Edit Tag dialog box, click the icon button and select from the list of icons under the Predefined heading.
To attach a tag to a picture, use Ctrl+T, or select Tags > Attach. You’ll now see a dialogue opening on the lower part of the screen where you can enter the tag you want to use.
To filter by tag, double-click the tag in the tag list, as shown in Figure. To remove the filtering, right-click the tag in the orange bar at the top of the display and select Remove from Search. F-Spot has a good range of export options for when you want to share your pictures with the wider world. You’ll find these under the Photo Export To option, and supported services include Picasa Web Albums, SmugMug, and Flickr. When using Flickr, F-Spot even includes an option to turn your tags into Flickr tags during the upload process.

Figure . Tag an image by using the Ctrl+T shortcut.