After the essential web browser, the most useful item in your toolkit when attacking a web application is an intercepting proxy. In the early days of web applications, the intercepting proxy was a standalone tool that provided the barest of possible functionality — notably the venerable Achilles proxy, which simply displayed each request and response for editing. Though extremely basic, buggy, and a headache to use, Achilles was sufficient to compromise many a web application in the hands of a skilled attacker.
In the last few years, the humble intercepting proxy has evolved into a number of highly functional tool suites, each containing several interconnected tools designed to carry out all of the common tasks involved in attacking a web application. There are three leading suites in widespread use, which we will examine in this section:
■ Burp suite
■ Paros
■ WebScarab
How the Tools Work
Each integrated testing suite contains several complementary tools that share information about the target application. Typically, the attacker engages with the application in the normal way via his browser, and the tools monitor the resulting requests and responses, storing all relevant details about the target application and providing numerous useful functions. Each suite comprises the following core components:
■ An intercepting proxy
■ A web application spider
■ An application fuzzer or scanner
■ A manual request tool
■ Various shared functions and utilities
Intercepting Proxies
The intercepting proxy lies at the heart of the tool suite and remains today the only really essential component. To make use of an intercepting proxy, you must configure your browser to use as its proxy server a port on the local machine. The proxy tool is configured to listen on this port and receives all requests issued by the browser. Because the proxy has access to the two-way communications between the browser and the destination web server, it can stall each message for review and modification by the user, and perform other useful functions.
Configuring Your Browser
If you have never set up your browser to use a proxy server, this is trivial to do on any browser. First, establish which local port your intercepting proxy uses by default to listen for connections (usually 8080). Then perform the steps required for your browser:
■ In Internet Explorer, go to Tools ➪ Internet Options ➪ Connections ➪ LAN settings. Ensure that the Automatically Detect Settings and Use Automatic Configuration Script boxes are not checked. Ensure that the Use a Proxy Server for Your LAN box is checked. In the Address field, enter localhost and in the Port field enter the port used by your proxy. Click on the Advanced button, and ensure that the Use the Same Proxy Server for All Protocols box is checked. If the hostname of the application you are attacking is matched by any of the expressions in the Do Not Use Proxy Server for Addresses Beginning With box, remove these expressions. Click OK on all the dialogs to confirm the new configuration.
■ In Firefox, go to Tools ➪ Options ➪ Connection Settings. Ensure that the Manual Proxy Configuration option is selected. In the HTTP Proxy field, enter localhost , and in the adjacent Port field, enter the port used by your proxy. Ensure that the Use this Proxy Server for All Protocols box is checked. If the hostname of the application you are attacking is matched by any of the expressions in the No Proxy For box, remove these expressions. Click OK on all the dialogs to confirm the new configuration.
■ In Opera, go to Tools ➪ Preferences ➪ Advanced ➪ Network ➪ Proxy Servers. Ensure that the Use Automatic Proxy Configuration box is empty. Ensure that the HTTP and HTTPS boxes are checked. In the address fields, enter localhost , and in the port fields, enter the port used by your proxy. If the hostname of the application you are attacking is matched by any of the expressions in the Do Not Use Proxy on the Addresses Below box, remove these expressions. Click OK on all the dialogs to confirm the new configuration.
Intercepting Proxies and HTTPS
When dealing with unencrypted HTTP communications, an intercepting proxy functions in essentially the same way as a normal web proxy. The browser sends standard HTTP requests to the proxy, with the exception that the URL in the first line of the request contains the full hostname of the destination web server. The proxy parses out this host- name, resolves it to an IP address, converts the request to its standard non-proxy equivalent, and forwards it to the destination server. When that server responds, the proxy forwards the response back to the client browser. For HTTPS communications, the browser first makes a clear-text request to the proxy using the CONNECT method, specifying the hostname and port of the destination server. When a normal (non-intercepting) proxy is used, the proxy would then respond with an HTTP 200 status code, keep the TCP connection open, and from that point onwards (for that connection) act as a TCP-level relay to the destination server. The browser then performs an SSL handshake with the destination server, setting up a secure tunnel through which to pass HTTP messages. With an intercepting proxy, this process must work differently in order for the proxy to gain access to the HTTP messages that the browser sends through the tunnel. As illustrated in Figure 19-3, after responding to the CONNECT request with an HTTP 200 status code, the intercepting proxy does not act as a relay but instead itself performs the server’s end of the SSL handshake with the browser. It also acts as an SSL client and performs a second SSL handshake with the destination web server. Hence, two SSL tunnels are created, with the proxy acting as a man-in-the-middle between them. This enables the proxy to decrypt each message received through either tunnel, gain access to its clear text form, and then reencrypt it for transmission through the other tunnel.
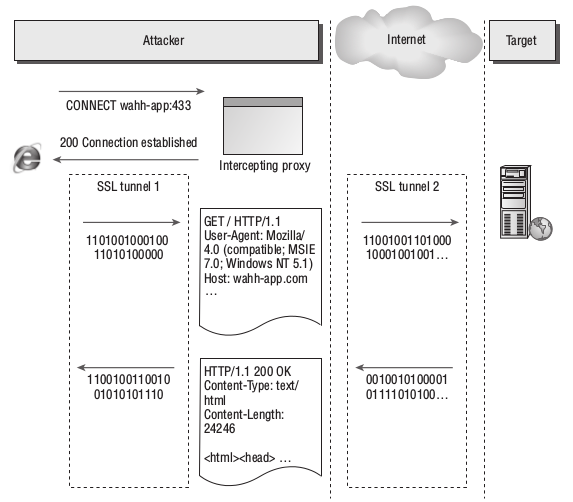
Figure -1: An intercepting proxy allows HTTPS communications to be viewed and
modified.
Of course, if any suitably positioned attacker could perform this trick with-out detection, then SSL would be fairly pointless because it would not protect the privacy and integrity of communications between the browser and server. For this reason, a key part of the SSL handshake involves the use of cryptographic certificates to authenticate the identity of either party. To perform the server’s end of the SSL handshake with the browser, the intercepting proxy must use its own SSL certificate, because it does not have access to the private key used by the destination server. In this situation, to protect against attacks, browsers present the user with a warning, allowing them to view the spurious certificate and decide whether to trust it. Figure -2 shows the warning presented by Firefox. When an intercepting proxy is being used, of course, both the browser and proxy are fully under the control of the attacker, so they can accept the spurious certificate and allow the proxy to create two SSL tunnels.
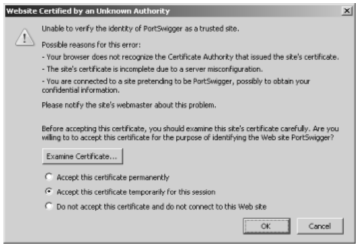
Figure -2: Using an intercepting proxy with HTTPS communications
generates a warning within the attacker’s browser.
Common Features
In addition to their core function of allowing interception and modification of requests and responses, the proxies in the three main tool suites contain a wealth of other features to assist you in attacking web applications. These include the following:
■ Fine-grained interception rules, allowing messages to be intercepted for review or silently forwarded, based on criteria such as the target host, URL, method, resource type, response code, or appearance of specificexpressions . In a typical application, the vast majority of requests and responses are of little interest to you, and this function allows you to configure the proxy to flag only the messages that you are interested in.
■ A detailed history and cache of all requests and responses, allowing previous messages to be reviewed, and passed to other tools in the suite for further analysis.
■ Automated match-and-replace rules for dynamically modifying the contents of requests and responses. This function can be useful in numerous situations — for example, to rewrite the value of a cookie or other parameter in all requests, to remove cache directives, to simulate a specific browser with the User-Agent header, and so on.
■ Access to proxy functionality directly from within the browser, in addition to the client UI. This enables you to browse the cache of requests and responses, and reissue individual requests from the context of your browser, enabling the responses to be fully processed and interpreted in the normal way .
■ Utilities for manipulating the format of HTTP messages, such as converting between different request methods and content encodings. These can sometimes be useful when fine-tuning an attack such as cross-site scripting.
■ A function to reveal any hidden form fields in application responses so that these are visible within the browser.
Web Application Spiders
Web application spiders work in a similar way to traditional web spiders — by requesting web pages, parsing these for links to other pages, and then requesting those pages, continuing recursively until all of a site’s content has been discovered. To accommodate the differences between functional web applications and traditional web sites, application spiders must go beyond this core function and address various other challenges, such as the following:
■ Forms-based navigation, using drop-down lists, text input, and other methods.
■ JavaScript-based navigation, such as dynamically generated menus.
■ Multistage functions requiring actions to be performed in a defined sequence.
■ Authentication and sessions.
■ The use of parameter-based identifiers, rather than the URL, to specify different content and functionality.
■ The appearance of tokens and other volatile parameters within the URL query string, leading to problems identifying unique content.
Several of these problems are addressed in integrated testing suites by sharing data between the intercepting proxy and spider components. This enables you to use the target application in the normal way, with all requests being processed by the proxy and passed to the spider for further analysis. Any unusual mechanisms for navigation, authentication, and session handling are thereby taken care of by your browser and your actions, enabling the spider to build up a detailed picture of the application’s contents under your finegrained control. This user-directed spidering technique. Having assembled as much information as possible, the spider can then be launched to investigate further under its own steam, potentially discovering additional content and functionality.
The following features are commonly implemented within web application spiders:
■ Automatic update of the site map with URLs accessed via the intercepting proxy.
■ Passive spidering of content processed by the proxy, by parsing it for links and adding these to the site map without actually requesting them.
■ Presentation of discovered content in table and tree form, with the facility to search these results.
■ Fine-grained control over the scope of automated spidering. This enables you to specify which hostnames, IP addresses, directory paths, file types, and other items should be requested by the spider, to focus on a particular area of functionality and prevent the spider from following inappropriate links either within or outside of the target application’s infrastructure. This feature is also essential to avoid spidering powerful functionality such as administrative interfaces, which may cause dangerous side effects such as the deletion of user accounts. It is also useful to prevent the spider from requesting the logout function, thereby invalidating its own session.
■ Automatic parsing of HTML forms, scripts, comments, and images, and analysis of these within the site map.
■ Parsing of JavaScript content for URLs and resource names. Even if a full JavaScript engine is not implemented, this function often enables a spider to discover the targets of JavaScript-based navigation because these usually appear in literal form within the script.
■ Automatic and user-guided submission of forms with suitable parameters .
■ Detection of customized File Not Found responses. Many applications respond with an HTTP 200 message when an invalid resource is requested. If spiders are unable to recognize this, the resulting content map will contain false positives.
■ Checking for the robots.txt file, which is intended to provide a black-list of URLs that should not be spidered, but which an attacking spider can use to discover additional content.
■ Automatic retrieval of the root of all enumerated directories. This can be useful to check for directory listings or default content.
■ Automatic processing and use of cookies issued by the application, to enable spidering to be performed in the context of an authenticated session.
■ Automatic testing of session-dependence of individual pages. This involves requesting each page both with and without any cookies that have been received. If the same content is retrieved, then the page does not require a session or authentication. This can be useful when probing for some kinds of access control flaw.
■ Automatic use of the correct Referer header when issuing requests. Some applications may check the contents of this header, and this function ensures that the spider behaves as far as possible like an ordinary browser.
■ Control of other HTTP headers used in automated spidering.
■ Control over the speed and order of automated spider requests, to avoid overwhelming the target, and if necessary behave in a stealthy manner.
Application Fuzzers and Scanners
While it is possible to perform a successful attack using only manual techniques, to become a truly accomplished web application hacker, you need to make use of automation in your attacks, to enhance their speed and effectiveness. we described in detail the different ways in which automation can be used, and each of the integrated test suites includes functions that leverage automation to facilitate various common tasks. The following features are implemented in the different tool suites:
■ Automated scans to detect common vulnerabilities. None of the integrated test suites performs the kind of advanced application scans carried out by dedicated vulnerability scanners . However, they can be used to send a set of attack strings as each parameter in a given request and analyze the application’s responses to identify signatures of common vulnerabilities.
■ Manually configured scanning for common vulnerabilities. This function enables you to control precisely which attack strings are used and how they are incorporated into requests, and review the results to identify any unusual or anomalous responses that merit further investigation.
■ A set of built-in attack payloads and versatile functions to generate arbitrary payloads in user-defined ways — for example, based on malformed encoding, character substitution, brute force, data retrieved in a previous attack, and so on.
■ Ability to save scan response data to use in reports or incorporate into further attacks.
■ Customizable functions for viewing and analyzing responses — for example, based on the appearance of specific expressions or the attack payload itself.
■ Functions for extracting useful data from the application’s responses — for example, by parsing out the username and password fields in a MyDetails page. This can be useful when you are exploiting various vulnerabilities, including flaws in session-handling and access controls.
■ Functions for analyzing cookies and other tokens for any sequences.
NEXT is..Manual Request Tools……………………………….,,,,,,,,,,,,,,,,,,,,,,,,,,,,,