Depending on the degree to which your computer supports power-saving functionality, Ubuntu will let you configure your display to go into standby mode after a certain amount of time and will also allow you to configure your notebook to enter sleep (standby) mode. In addition, if you use a notebook computer, Ubuntu might let you configure additional aspects, such as the display brightness. These functions are controlled by using the Power Management Preferences. To start this, from the Panel select Applications and in the search bar type Power. Now click the Power Management icon. If Ubuntu is installed on a notebook computer, you’ll see three tabs in the program window: OnAC Power, On Battery Power, and General. If Ubuntu is installed on a desktop computer, you’ll see just the On AC Power and General tabs.
Notebooks have the additional tab because it’s possible to define two separate power management profiles: one for when the computer is plugged in and one for running on battery power. This makes sense, because you might never want your display to switch off when connected to an outlet, but it’s advisable that it should deactivate within, say, 15 minutes of inactivity if the computer is running on battery power (to extend the life of the battery).
The three tabs of the Power Management applet are explained in the following sections.
On AC Power
If your computer is a desktop PC without a battery, you’ll see two options under the On AC Power tab: Put Computer to Sleep When Inactive For and Put Display to Sleep When Inactive For. The dropdowns next to each of these options allow you to define one of a number of preset time limits before each feature kicks in, including the option of Never. There is also a check box which enables you to spin down the hard disks when possible, at the same time as the computer is put to sleep.
If your computer is a notebook computer, you’ll see some extra options. Depending on the technology used in your computer, you might see a Set Display Brightness To slider, which you can use to set the brightness of the screen when the power is connected. Whenever mains power is connected, the display brightness will be changed to match this setting.
You may see a When Laptop Lid Is Closed option, with a drop-down list. As it suggests, this will control what happens when the notebook is closed. Depending on the hardware contained in your computer, you might have the choice of doing nothing, blanking the screen, suspending the computer (shutting down all systems but RAM), hibernating (suspending RAM to disk and turning off the notebook), and shutting down the computer. However, not all computers support each of these modes, so the choices you see might vary.
Additionally, you may see a Dim Display When Idle check box, which you can select to conserve power by dimming the screen when your system is idle.
On Battery Power
The options under the On Battery Power tab, present only on a notebook computer, are largely the same as those under the On Mains Power tab, as you can see in Figure. These settings come into operation the instant the mains power is disconnected from your notebook and the battery kicks in.
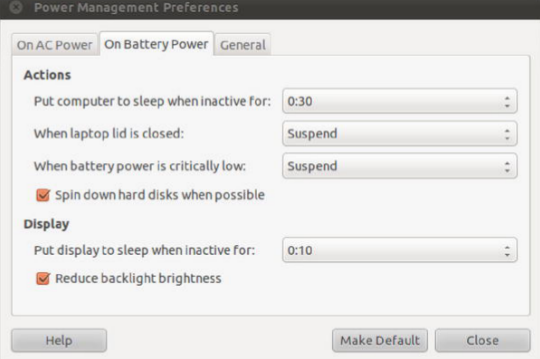
Figure . Notebook users can define an additional power profile that will kick in when the battery is
in use.
An extra option appears as the last item in the Actions section: When Battery Power Is Critically Low. Here you can opt to automatically suspend, hibernate, or shut down the notebook when the battery power is nearly gone.
The check boxes at the bottom of the Display section could help save battery power considerably. You may select the Reduce Backlight Brightness option, which as it suggests, sets backlight brightness to a lower setting when you run on battery power. As with On AC Power, the Dim Display When Idle option may also be available for battery power.
General
Under the General tab, you have options to customize button actions and notifications. These settings persist whether the computer is on mains or battery power.
In the Actions section, you can set what happens when the power button is pressed and the computer is active. Effectively, this controls whether pressing the button when Ubuntu is running should shut down the computer, suspend it, or hibernate it. You can select Ask Me, which will cause the standard Quit dialog box to appear (that is, the same dialog that appears if you click the Session Menu icon in the top-right corner of the screen). You can also customize the action for the suspend button. The available actions are to do nothing, suspend, or hibernate. Hibernate writes the contents of RAM to the hard disk and then shuts down the computer. Suspend shuts down most systems of the computer except for the RAM, which is kept active. Then, when you press a key or move the mouse, the computer wakes up almost instantly as the subsystems are reactivated.
The General tab also lets you select whether the power icon is visible in the notification area. If you’re using a notebook, you can choose to display the icon only when the battery is nearly drained, when your battery is charging or discharging, or regardless of the battery state. Desktop PC users will probably opt not to display the power icon at all. The most fuss-free option is perhaps Only Display an Icon When Charging or Discharging, which is selected by default.
Finally, there’s also an extra option you can select to play sounds when error events occur.