Mouse and key repeat speeds are personal to each user, and you may find the default Ubuntu settings not to your taste, particularly if you have a high-resolution mouse such as a gaming model. Fortunately, changing each setting is easy.
Configuring Mouse Options
Open Applications and in the search bar, type mouse to display the Mouse Preferences icon. Click it to open the Mouse Preferences dialog box, which has General and Accessibility tabs. On a laptop, you might also see the Touchpad tab.
General Mouse Settings
On the General tab of the Mouse Preferences dialog box, you can configure several options.
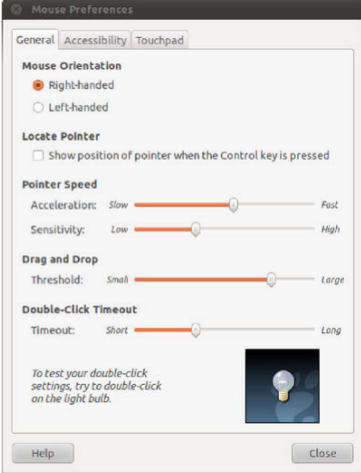
Figure . The Mouse Preferences dialog box lets you tame that mouse.
These options are as follows:
• Mouse Orientation: This option lets you set whether the mouse is to be used by a left-handed or right-handed person. Effectively, it swaps the functions of the right and left buttons.
• Locate Pointer: This option allows you to show where the mouse is by displaying a ripple surrounding the mouse pointer when you press the Ctrl key. This can be useful for partially sighted people who may not be able to locate the cursor on a busy Desktop.
• Acceleration: This setting controls how fast the mouse pointer moves. Whenever you move the mouse, the pointer on the screen moves a corresponding amount. However, the cursor actually increases in speed the more you move your hand (otherwise, you would need to drag your hand across the desk to get from one side of the screen to the other). This is referred to as acceleration. If you set the acceleration too high, the pointer will fly around the screen, seemingly unable to stop. If you set it too slow, you’ll need to swipe the mouse several times to make it go anywhere.
• Sensitivity: This setting controls how quickly the acceleration kicks in when you first move the mouse. Choosing a higher setting means that you can move the mouse relatively quickly before it starts to accelerate and cover more screen space. A low setting means that acceleration will begin almost as soon as you move the mouse. Higher sensitivity settings give you more control over the mouse, which can be useful if you use image-editing programs, for example.
• Drag and Drop: This setting determines the amount of mouse movement allowed in a dragging maneuver before the item under the cursor is moved. It is designed for people who have limited dexterity and who might be unable to keep the mouse perfectly still when selecting an item. In such cases, a large threshold value may be preferred.
• Double-Click Timeout: This is ideal for those who are less physically dexterous, because the double-click speed can be slowed down. On the other hand, if you find yourself accidentally double-clicking items, you can speed it up. Test your settings by double-clicking the lightbulb image.
Accessibility Settings
The settings on the Accessibility tab can help people with physical disabilities use the mouse. However, to enable these features, you need to enable Assistive Technologies in Ubuntu first, as follows:
1. Open the Assistive Technologies Preferences dialog box (from the panel, click Applications and type assist in the search bar. This will show the Assistive Technologies icon. Click it to open the Assistive Technologies preferences.
2. Select the Enable Assistive Technologies check box and then click the Close and Log Out button (this is necessary to start the background services).
3. Select Log Out in the Shutdown dialog box, and then log back in again when prompted.
4. After logging in, return to the Accessibility tab of the Mouse Preferences dialog box.
From the Accessibility tab, you can enable Simulated Secondary Click and dwell click options. Selecting the “Trigger secondary click by holding down the primary button” check box simulates a right-click after you hold the left-click for a certain amount of time (useful for those having trouble right-clicking). The right-click actually occurs when you release the mouse button, for instance bringing up a context menu if you’re clicking on a file icon. The amount of time you have to hold down the mouse button can be configured by moving the Delay slider to the left for a faster response or to the right for a longer delay.
A dwell click allows you to simulate a mouse-click action after the mouse pointer has been left idle for a certain amount of the time so, for instance, hovering over an icon for a few seconds could double-click it to launch an application. To enable this feature, select “Initiate click when stopping pointer movement.” You can set the length of the idle time by moving the Delay slider to the left for less idle time or to the right for a longer delay. The Motion Threshold setting determines the amount of pointer movement allowed while the mouse is still considered idle (useful for those who might be unable to control small movements of their hands). Moving the Motion Threshold slider to the left makes the mouse pointer sensitive; moving it to the right makes the pointer less sensitive. You can choose two types of dwell click:
• Choose type of click beforehand: This option automatically clicks the mouse when the mouse pointer is idle. If you want to choose the type of mouse click each time, put a check in the box beside Show Click Type Window. This will show a floating window, from which you can select various types of clicks, such as single-click, double-click, and so on. Alternatively, you can choose the mouse click from the Dwell Click applet instead.
• Choose type of click with mouse gestures: This option allows you to choose the type of mouse click to execute when the mouse movement is idle by moving the mouse in a certain direction, usually up, down, left, or right. Just wait until the mouse turns into a cross and then move the mouse. After you’ve performed the movement, the mouse will return to its original location before it was moved. All the mouse movements can be customized by changing the gestures in the drop-down lists for Single Click, Double Click, Drag Click, and Secondary Click.
Touchpad Settings
The Touchpad tab in the Mouse Preferences appears on laptops only. You can set the following options:
• Disable touchpad while typing: It’s easy to brush against the touchpad accidentally with the ball of your thumb while you’re typing. This option, which is enabled by default, eliminates the problem by disabling the touchpad momentarily after each keypress.
• Enable mouse clicks with touchpad: This allows you to simulate a mouse click by tapping the touchpad. Depending on the sensitivity of your touchpad, this is either great or the most annoying thing in the world.
• Scrolling options: Like a scroll wheel on a mouse, your laptop’s touchpad can be used to scroll pages and images up and down, or even left and right. By default, vertical edge scrolling is enabled, so that running your finger up and down the right edge of the touchpad will scroll web pages up and down. If you enable horizontal scrolling, you will additionally be able to scroll left and right by running your finger along the bottom edge of the touchpad. The two-finger scrolling option disables edge scrolling, and instead makes the touchpad scroll if you have two fingers moving on it at the same time. If you don’t like any of these features, you can choose to disable scrolling completely.
Changing Keyboard Settings
From the applications interface, type keyboard. This shows the Keyboard icon which you can use to open the Keyboard Preferences dialog box. This dialog box has five tabs: General, Layouts, Accessibility, Mouse Keys, and Typing Break.
General Settings
The General tab offers Repeat Keys settings and a Cursor Blinking slider. You can alter the rate of key repeat, which can be useful if you often find yourself holding down the Backspace key to delete a sentence; a shorter setting on the Delay slider and a faster setting on the Speed slider can help. However, if you make the delay too short for your typing style, you may find double characters creeping into your documents; typing an f may result in ff, for example. Modifying the Cursor Blinking slider setting may help if you sometimes lose the cursor in a document. A faster speed will mean that the cursor spends less time being invisible between flashes.
Layouts Settings
On the Layouts tab, you can choose your keyboard model, add an alternative keyboard layout, and configure layout options. Typically, the generic keyboard works fine for most setups. However, if you want to make full use of the extra keys on your keyboard, such as Mail, Web, Power, Sleep, Suspend, and so on, you should select your keyboard model.
Accessibility Settings
As with the mouse, there are also accessibility options for keyboard users to help people with physical disabilities. On the Accessibility tab, you can configure the following settings:
• General: You have an option to enable/disable (“toggle”) accessibility features with keyboard shortcuts. This is disabled by default.
• Sticky keys: Some people are unable to hold down more than one key at a time, which is a problem if you want to type a keyboard shortcut such as Ctrl+S to save your work. As its name suggests, the sticky keys feature “holds down” keys such as Shift, Ctrl, and Alt while you press another key on the keyboard. To enable sticky keys, select the Simulate Simultaneous Keypresses check box. You can test sticky keys by running the File Browser (click Files and Folders from the panel). Try pressing Alt and F sequentially; Nautilus will open the File menu as if you pressed those keys simultaneously. If you would like to disable sticky keys on the fly, without having to use this dialog box, select “Disable sticky keys if two keys are pressed together.” You can test this by pressing Ctrl+Alt. A Sticky Keys Alert dialog box will appear to prompt you to disable sticky keys.
• Slow keys: This feature controls the reaction rate of keys. By moving the Delay slider to the left, the reaction rate of the keys becomes faster. By moving the slider to the right, the reaction rate of the keys becomes slower, to the point that you would need to hold the key for a certain amount of time for it to be considered as a key press. This has obvious uses for people with limited dexterity in their fingers, but most people will not want this enabled.
• Bounce keys: This feature controls the repetition of letters on the screen when the same key is accidentally pressed. By moving the slider to the left, the repeat rate will be quicker; moving it to the right adds time for the key to be repeated.
Typing Break Settings
The Typing Break tab features a function that can force you to stop typing after a predetermined number of minutes, to give your fingers and wrists a rest. It does this by blanking the screen and displaying a “Take a break!” message. Note that a notification area icon will appear before the break time to give you advanced warning of the lockout.
Creating Keyboard Shortcuts
Ubuntu lets you define your own keyboard shortcuts for just about any action on the system. To create a shortcut,from the Panel, open Applications and type keyboard. This shows a few icons, including the Keyboard Shortcuts icon. Click it andin the dialog box, search through the list for the action you want to create a shortcut for, click it, and then press the key combination you want to use. For example, you might locate the Volume Up and Volume Down entries in the list, click each, and press Ctrl+left arrow and Ctrl+right arrow. Then you will be able to turn the volume of your sound card up or down by holding down Ctrl and tapping the left or right arrow key, respectively.