The Calendars mode of Evolution allows you to keep an appointments diary. Entries can be added in half-hour increments to the working day, and you can easily add events to days that are weeks, months, or even years in advance. Viewing a day’s appointments is as simple as clicking its entry in the month view at the top right of the program window.
Specifying Appointment Types
You can make the following three types of diary entries:
Appointments: These are events in your diary that apply to you only. You might have a meeting with a colleague, for example, or you might simply want to add a note to your diary to remind you of a particular fact.
All-day appointments: A training day or a holiday could be entered as an all-day appointment. However, all-day events don’t block your diary, and you can still add individual appointments (after all, just because your day is taken up with an event doesn’t mean you won’t need to make individual appointments during the event). All-day events appear as a light-blue bar at the top of the day’s entry in your diary.
Meetings: Meetings are like appointments, but you also have the option of inviting others to attend. The invitations are sent as iCal attachments to e-mail, so users of Microsoft Outlook should be able to reply to them (provided Outlook is properly configured; see the program’s documentation for details, and note that iCal is sometimes referred to by the specification number RFC 2446/2447).
After receiving a meeting invitation, an individual can click to accept or decline. When Evolution receives this response, the individual’s acceptance or declination will be automatically added to the diary entry.
Adding or Editing a Diary Entry
These instructions assume that Calendars mode is set to Day view, which shows a full working day diary alongside a monthly calendar. To ensure Day view is selected, click the Day icon on the main toolbar running across the top of the screen. Day view is the default calendar view under Evolution. The other choices are Week, Month, and Work Week (which shows appointments during the week in daily columns). If you switch to another view, Evolution will always work in that view until you change back again.
To add a new diary entry, simply select the day in the monthly calendar on the left, and then select the time the appointment is to start in the day viewer. Then right-click and choose an appointment, an all-day event (this is called an all-day appointment on the New button on the toolbar), or a meeting. To edit an existing diary entry, double-click its entry in the list.
At its most basic, all an appointment needs in order to be entered into your diary is some text in the Summary field, as shown in Figure. By default, appointments and meetings are assumed to last for half an hour, but you can adjust this by using the arrows in the Hour and Minutes sections. For longer appointments, such as a holiday or conference that may last days or weeks, use the drop-down labeled For, select Until, and then define a finishing date or time.
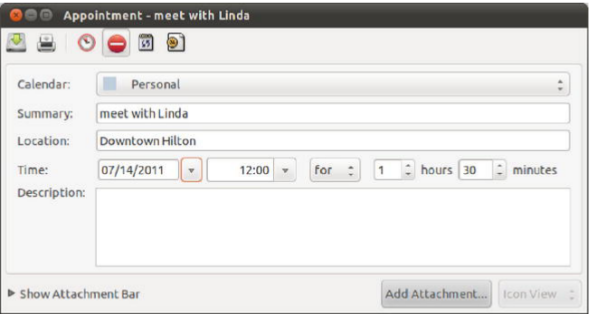
Figure . When creating a new appointment, you can add all the details you need, but don’t forget to
set how long it lasts!
By clicking the Recurrence button on the toolbar (note that not all buttons are visible in the default program width), you can set the appointment to be booked into your diary according to certain intervals. Start by putting a check in the This Appointment Recurs box, and then select a time interval. For example, selecting “1 week” will mean that the appointment is booked into your diary automatically on a weekly basis. After this, select a day of the week for the recurring appointment. Following this, you must specify the number of recurrences. You can specify an ending date for the appointment or select Forever. In the calendar view at the bottom of the dialog box, you’ll be able to see how this looks. Days in bold are those that have appointments.
It’s also possible to set exceptions, as when the meeting might skip a week. This could be useful to work around holidays, for example. Simply click the Add button, and then type a date or click the down arrow to select the date from a calendar. Finally, you can also add attachments to an appointment—a meeting agenda, minutes, and so forth—by clicking the Attach button and locating the appropriate file. When you’re finished, click the Close button to add the details of the recurring event to the appointment.
In the case of meeting appointments, you can click the Add button to invite others to the meeting via iCal invitations, which will be sent out by e-mail as soon as you’ve finished creating the appointment. Simply click the Add button, and in the empty field that appears, start typing the contact name of the individual you want to invite. If the person is already in your contacts list, the name will be automatically completed, but you can also type individual e-mail addresses. By clicking the entry under the Role heading, you can alter the role of the individual. The choices are Chair, Required Participant, Optional Participant, Non-Participant (i.e., somebody you want to inform about the meeting but who doesn’t need to attend), and Unknown (for all other instances).
Clicking the Free/Busy button will open a new dialog box showing who can and can’t attend, according to replies to the invitations sent out (obviously, this is a feature you’ll be using after you initially create an appointment). On the left side of the dialog box, you will see the list of attendees and also their status: whether they’ve accepted, declined, or sent a busy/tentative reply (in which case you might choose to reschedule the meeting).
Additional Calendars
For those with complicated lives, Evolution can manage multiple calendars sourced from either your local machine or from an online service such as Google Calendar. Moreover, each one can be assigned a different color so you can see how events clash (or not) at a glance. To create a new local calendar, right-click the Calendars pane (on the left) and select New. Choose On This Computer from the drop-down, provide a name for the new calendar, and choose a color. When you create a new event, specify the
appropriate calendar, and the event will be highlighted in its color.
You can also add a Google calendar by following the preceding instructions but choosing Google from the drop-down. Supply your Google credentials and then choose a calendar from those available. Again, you can define a color to apply to this calendar, as in Figure. The Google option is limited to viewing information added to the web service, so you can’t add events by using Evolution, but this is a great way to access some of the many public calendars (such as national holidays and football match fixture lists) available on the Internet.
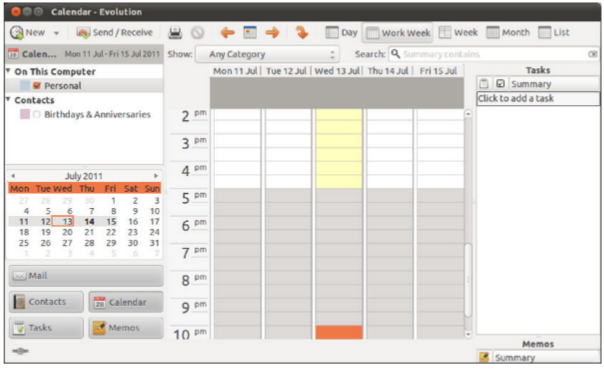
Figure . Evolution can manage both local calendars and remote calendars from the Internet, making
it ideal for creating and sharing group calendars.