In the last few years, the use of social networks has experienced staggering growth. Sites like Twitter and Facebook serve millions of users per day and generate terabytes of data.
Ubuntu 10.04, released on April, 2010, was designed to be “social from the start,” which means that it integrated with social networks seamlessly. Natty Narwhal builds upon this solid foundation. In the first section of this chapter we look at some of the applications you can use for this purpose.
Introducing the MeMenu
Natty Narwhal includes the applet known as the MeMenu, located in the top panel, next to the Date and the Shutdown button, as is shown in Figure. It was so important for the developing team that its interface was sketched by Mike Shuttleworth himself. The MeMenu is the cornerstone of a strategy to make you feel like there is no real difference between your local account and your online persona; they are one and the same. Once you log in to Ubuntu, you are online!
The MeMenu allows you to set status for instant messaging (IM) accounts and to broadcast posts to all your social networks, including Twitter and Facebook. Not all sections are shown by default; some only appear after you have configured certain types of accounts.
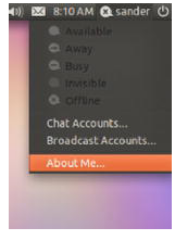
Figure. The MeMenu allows you to set IM status and to broadcast to your social networks.
Title: The Title section includes an icon representing the online status of your IM accounts, and your short name as specified in About Me. It could be that your multiple Chat accounts will have different statuses; in that case, the icon appears as a thick dash—or as disabled if no Chat account has been created.
Broadcast: The Broadcast section consists of a text box. It is shown only if you have created at least one Broadcast account. You can enter text in the box, and it’s posted to all checked Broadcast accounts the moment you press Enter. Be aware that some social networks limit the number of characters of your posts (Twitter’s tweets are limited to 140 characters; Facebook status updates can run to 420 characters).
IM Status: The IM Status section lets you set the status for multiple Chat accounts. You have several options: Available, Away, Busy, Invisible, and Offline. Selecting one option sets all Chat accounts to that status.
Account Configuration: The Account Configuration section lets you associate your online accounts with your profile. You can create both Chat accounts and Broadcast accounts. There’s also a pointer to Ubuntu One, a cloud-based storage service about which we will talk later.
The MeMenu relies on Empathy for Chat accounts and on Gwibber (more about it later) for Broadcast accounts. Those applications should be installed if you want to create accounts of each type.
Microblogging with Gwibber
Gwibber is a microblogging client for the GNOME desktop environment that you can use to access Twitter, Facebook, and other social networking sites.
Microblogging is a complex cultural phenomenon, but in itself consists of only two basic operations: to post content, and to read other users’ posts (called following, as on Twitter). It is the aggregation of millions of such operations a day that renders microblogging so interesting.
As the number of social network sites continues to grow, it is hard for users to keep up the pace. We want our posts to have the greatest impact, so we need to send it to every single microblogging site available, just to make sure no one misses it. On the other hand, we want to receive the most relevant content, no matter where it was originally posted. We can’t stick to a single service, we must use them all.
Without tools that help us with these tasks, to fulfill that simple objective we would have to update every site manually, using a web browser, and then check them one by one to see if there is some interesting stuff. We would rarely have time to do this.
Someone once said: “I will work 24 hours a day, and nights too.” That sentiment also seems to apply to social networking.
Here’s where Gwibber comes in. It allows you to post to multiple sites at the same time and follow content from different sources. Whereas the MeMenu can post short messages to some microblogging sites, Gwibber lets you also read other people’s threads.
Gwibber is installed by default, and you can easily start it from the Applications icon in the Unity Panel. The basic interface, as shown in Figure, is quite simple.
Figure . Gwibber lets you configure multiple social networking sites.
At the top is a menu that contains only three entries: Gwibber, Edit, and Help. The main section is divided into two panes: the Streams pane, where you can see your mailboxes, and the Details pane, where the selected mailbox actual posts are shown.
At the bottom, the Broadcast text box is shown, along with icons representing each of your microblogging accounts. You can enter your thoughts into this text box, and when you press the Enter key they will be automatically posted online. You can select which sites to post the message to by enabling or disabling the icons in the Send with: area. If the microblogging sites have a restriction for
post’s length, the number of remaining characters available will be displayed at the right inside the text box. Very handy!
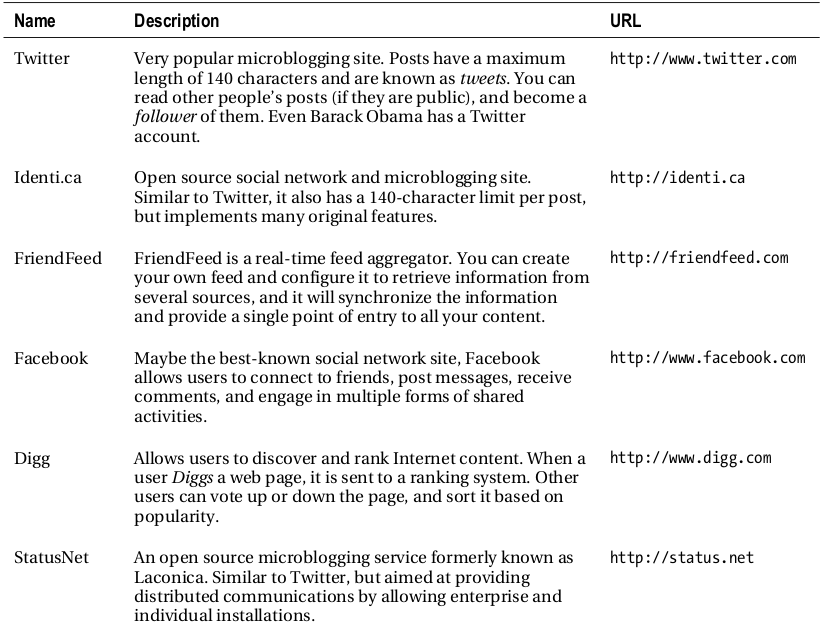
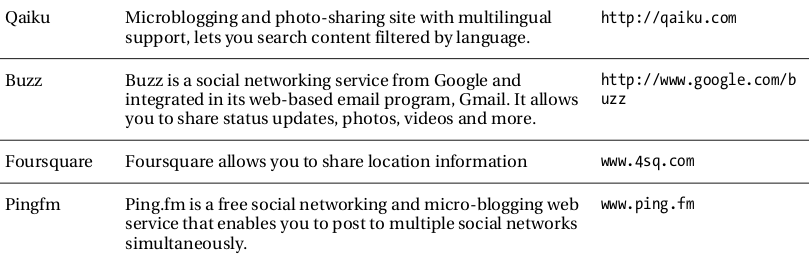
Gwibber supports many social networking sites, as listed in Table, but for Gwibber to work with them you must first have an account created for that site, and in some cases you must explicitly allow Gwibber to access your information. Only Twitter, Facebook and Identi.ca are supported by default. If you want to use any of the other sites, you need to install the corresponding Add-on through Ubuntu Software Center. Search for the packet Gwibber Social Client and click More Info; you will see a list of available add-ons. Select the ones you want to install and then press the Apply Changes button. More information about installing software.
Table . Services Supported by Gwibber
Once you have created your microblogging accounts, you’re ready to add them to Gwibber. Select Edit > Accounts and click the Add… button. Select the account type from the list and click Add. Depending on the type of account you add, you will be asked for various information.
For each account you configure, you will have a new group in the Streams pane. You can display all the posts from all your sites by selecting the Home section, or view more specific streams of posts by selecting the mailbox of the specific site. You have also the Search sections, in which you can look for specific text in the social networks to see what other people are saying about a particular topic. From now on, you can read other people’s posts, create your own messages and post them online, and master the social network from a single, easy-to-use application.